 Every year, it has become more difficult to get commercial yarn. I live in Canada, and this is how it works: $10-20 per 100 grams, inside or outside of Canada. 100g of fingering weight sock yarn is usually enough for 1 pair of socks. Now that the Canadian dollar is significantly lower than the US, and shipping has simultaneously gone up, it gets expensive to buy outside of Canada. Sometimes I’ll find a good deal outside of Canada, but then get a bill that makes up the difference in price. For example, if I find a ball of yarn that is $5 (factoring the US dollar, shipping, etc) outside of Canada, I may get an extra bill from Customs for $5-15 per ball that destroys my savings. The whole experience is a crap shoot. Still, there are some good deals out there. Especially for machine knitters, I wanted to share my good experiences.
If you’re new to machine knitting, I’d like to introduce you to Loops and Threads Wool-like yarns. Not self-striping, but lots of colours to try out. It’s very stretchy and runs through the machine like butter, but watch out(!) for those tangles. Tangles in the centre. Tangles while knitting. Frustrating tangles at the end. Cutting out tangles. Still, at $6 for approximately 600 yards in one ball, you’ll be glad you learned on it.
This year, Herrschners rolled out their brand of sock yarn called Sundance. I love it – it feels nice, has great self-striping colours, and right now is on sale for under $10 CAD. My advice is to buy it before you need it, because sometimes it can be stuck at the border – for 20 days or more. Yep, it happened to me.
I also came across a great yarn called Drops Fabel from The Yarn Guy in Toronto. The yarn is currently at $5.95 CAD for 50g, so $13.00 for 100g. Here’s the great part about that though. If you look at the yardage, it’s a whopping 224 yards. That means you can get about 3 average size socks from 2 balls for $13.00. If you buy in 3’s, the cost goes way down. I like the variety of colours, it is a bit on the rough wool side and the yarn can be a little sticky to knit from the centre of the ball – you will get it tangled if you’re not careful. It washes and dries fine, but sometimes the yarn just…..breaks. I can fix it, but it’s a consideration. The Yarn guy also has free shipping over a certain amount. Stock up, because he’s got fabulous colours, not just one or two.
The Yarn Guy also has cones of yarn, his e-Tent yarn is waay better selection than Listowel and he’s fast with his shipping. It really is worth it if you order more than $100 in yarn.
Another great yarn that has generous yardage is Premier. Their wool free sock yarn frequently goes on sale, they have free shipping over a certain amount, and you can get 3 socks from 2 balls of 50g. I love the Wool Free because it is satin-y, great for summer socks, and the colours are saturated so well they’re bright and rich.
Mary Maxim has 2 of their own brand that are under $10 (make sure you are on the Canadian site when you order). I have bought a lot of their sock yarn and I am pleased with about 50% of them. I have a lot in my stash that they discontinued. I recommend Footloose, but the Sweet Socks look like they’re being discontinued soon. Both of them knit nice on the machine, but they are sticky (tangles!). If you’re a handknitter, you probably don’t want to knit with them. After a wash they feel soft enough, but if you put these socks in a room with any of the other socks on this page, they’re not appealing.
And we come down to Patons. A Canadian company that manufacturs their yarn in Turkey and has been around for ages. They have been slow to come out with new colours, and their prices have been about $13 for 2 balls of 50g. Even at Listowel. Their 50g is 166 yards, which is just barely enough for an average men’s sock. They’re thicker and they feel like wool – which is important in the winter especially. They wash and dry well, and they last a lot of years. They were my favourite, but I have a feeling they are gearing down based on the shelf stock I’m seeing this year.
A new yarn from Listowel is Sugar Bush. They have come out with some soft yarns and wonderful colours, and it is a bit thicker than Patons which affects the circumference of the sock I make. Also, the 50g ball is 153 yards. That means you have to buy 3 50g balls to make a decent pair of socks — at a whopping $13 each. I think this is likely because they’re not as big as other manufacturers, plus the US Dollar/Shipping costs – which don’t just affect us personally, it affects companies too.
We also have a secret weapon in the CSM world. This company in Hamilton offers European Coned Yarn – like Opal, Ferner, Comfort. About 1000 grams and very reasonable. If you know you’re going to love the colour for more than one ball, I highly recommend Fischerwool.
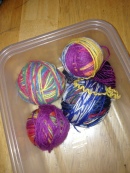
Lastly, I’d like to talk about your basic Superwash super fun Wool/Nylon that you can get at your Local Yarn Store. Anywhere from $15-$20 for 100g these are sooo squishy to run your hands through. You want to hand knit them, and they just go through the machine like butter. If you really love someone, make socks from this wool. Or Bamboo. Or Soy. Or Indie dyers. There are so many lovely options!
So, there’s a sock yarn roundup for 2017. I would love to hear about your favourite yarns to buy in Canada and if you can get a better deal – definitely let me know!
 I make a pair of these every year for myself every winter because they’re so darn handy in the car….pun intended! They’re not really for making snowballs, but they keep my hands insulated from that c-c-cold steering wheel. Plus, if I get talking outside to a teacher, or another mom I can just flip them over and tuck them in like a mitten. Win-win!
 Re-hang the edge stitches on both sides (circled)
 16 stitiches taken off the front needles after Bind off.
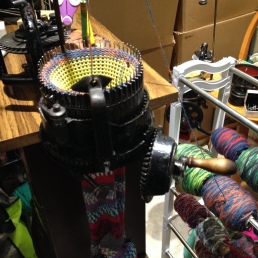
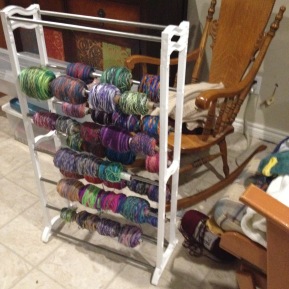 I have built a new stand to create “frankensocks” on the CSM. I needed a place to put a lot of bits of yarn that have been wound into cakes so that I can see the colours as I knit. Before now, I used a pegboard on the wall, but I found that the pegboard fell, the cakes fell….it was a mess.
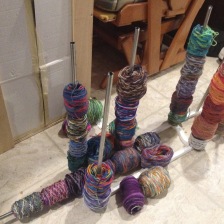
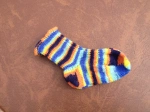
 I made these socks with the same amount of rows, the same yarn, washed and dried in the machines.